Creating Lifelike Skin Tones in Colored Pencil: Tips for Killer Portraits


One of the things we love about colored pencils is that you really can draw just about anything with them. But skin tones are extra tricky — every single portrait is different, and getting a natural look is totally essential. Luckily, a few technique tips go a long way when it comes to perfecting realistic colored pencil skin tones . Next time you put pencil to paper, you'll be ready!

The colors you select depend on the skin tone of the person you're drawing, of course. Start by considering whether they are light-, medium- or dark-skinned, but also pay close attention to their skin's undertone. Some people have more pink undertones, while others might haven a golden or olive tint. Taking note of these details will help you narrow down the right shades.

Beginners are likely to reach for "skin-colored" pencils like browns, beiges, pinks and golds — and that's a great place to start. But if you're already experienced in layering and blending colors , try including some unconventional hues like blues, purples and greens. You'll be surprised by how these give the skin extra depth.
No matter the skin tone you're seeking to create, the same rules apply: Use your lightest colors as an accent, your darkest as the shadows, and fill in all the rest with your midtones.
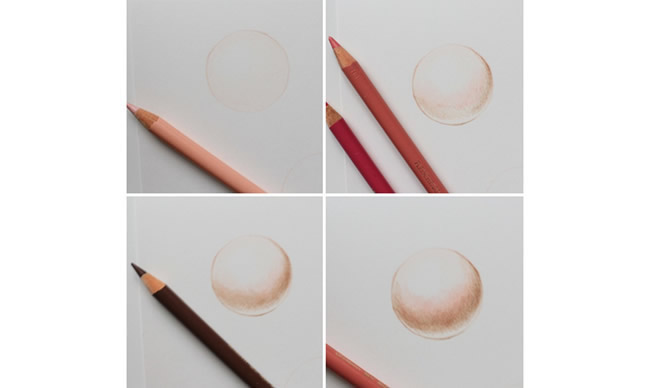
Choose a highlight color and create a base by coloring the whole surface of the skin except for the brightest section right where the light hits the body.
With your midtone colors, fill in the in-between section, adding some saturation.
Use a dark shadow color to deepen the darkest areas. Then grab one of the midtones you used in Step 2 and layer this color over the section where the midtones meet the shadow tones to blend the two shades together. Color lightly in circular motions to avoid any lines and streaks.

Using another highlight color, brighten the edges of the area where the light touches the body.
Continue layering your highlight and midtone colors over what you've already laid down. Increase the pressure you use , and mix everything together by coloring in circular motion.
