How to Crush 3-Point Perspective for the Ultimate 3-D Drawing Experience

Let's get some perspective on three-point perspective drawing. First of all, what exactly is it? Here's a quick refresher for anyone who can nail one-point and two-point perspective drawing and feels ready to take on the big three.
The main thing to remember about three-point perspective is this: In basic one-point perspective drawing , lines are either vertical, horizontal or receding toward the vanishing point . In two-point, lines are either horizontal or receding toward one of the two vanishing points. In three-point perspective, all lines recede toward one of the three vanishing points.
Those three vanishing points (VPs) make the biggest difference between three-point and the other kinds of perspective drawing. Two VPs are along the horizon, just like in two-point, but the third VP is located either above the horizon (at the zenith) or below the horizon (the nadir), depending on the area you want to draw.
The three vanishing points make up a triangle, with the viewer's center of vision roughly in the middle.
Ready to make a basic three-point perspective drawing?
Start by drawing a simple shape in three-point perspective. Begin as you would in two-point perspective, with a horizon line and two vanishing points as close to the edge of your page as possible. But instead of putting the horizon line in the middle, place it close to the top of your page (if the viewer will be looking down) or the bottom of your page (if the viewer will be looking up).
Next, position a third vanishing point as far from the horizon as possible. That point can fall anywhere between the horizon vanishing points, although putting it closer to the middle will work better for what we're trying to do here.
Now, draw lines connecting the three VPs.

Note: This triangle is very important. To avoid distortion, you need to keep your drawing inside this triangle. Anything outside the triangle won't look right, but everything inside should appear normal. Take a look at the two shapes below: They're actually the same box, drawn inside and outside the triangle.
.jpg)
Now, draw a line anywhere you'd like within the triangle, toward VP3. Your line doesn't have to be vertical. You can make it any length you want. It can end before it reaches VP3, as long as it would end there if you extended it.

Draw lines from both ends of this line toward both of the horizon VPs, just as you would in a two-point perspective drawing.

To figure out where your shape ends in space, draw lines from VP3 through both sets of lines receding toward the two horizon VPs.

All you do now is draw lines from the back corners toward the opposite horizon VPs, and you've just completed a simple shape in three-point perspective. Feel free to erase any construction lines.

You're now officially ready to start drawing more complicated shapes. Explore away, as long as you remember that all lines should recede toward one of the three VPs.

Pro tip: By constructing your vanishing points outside your picture plane, you can easily avoid the problem of accidentally drawing outside the triangle.
Here are a few ways you can do this:
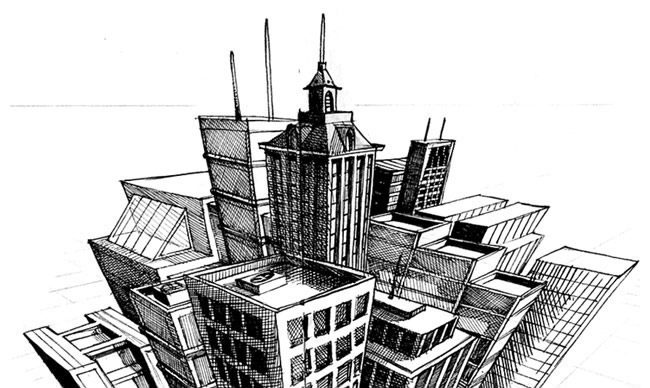
Want to see what that looks like? Check out the city skyline image below, and happy experimenting!

© 2007 Paul Heaston
