How to Paint Metallic and Shiny Surfaces in Oil and Acrylic

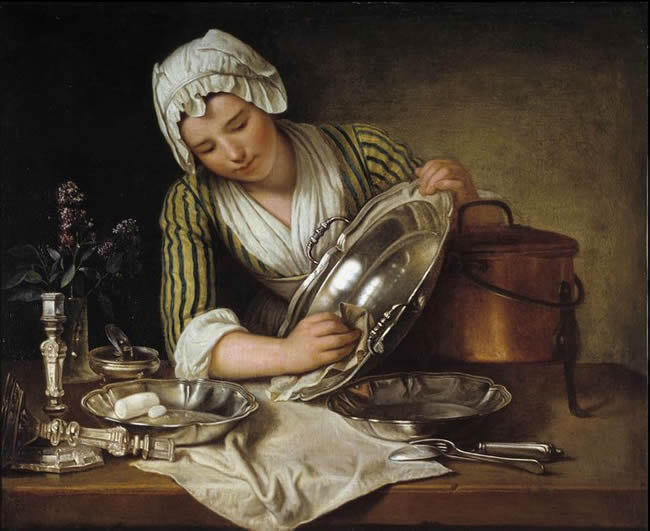
It is very impressive to see the Old Master's paintings of exquisite silver and brass, as in Andre Bouys painting, La Recureuse (1737), shown here, in which the silver platter is painted so convincingly that it looks real. One might wonder whether it was painted with metallic paint. Not so, however. Rather, the painting is done with regular paints through the sheer power of keen observation.
By observing closely the highlights, shadows, and reflections of a metallic object, thinking of them as distinct abstract shapes, and paying attention to the relationships of the values, shapes, and colors that you see, you can create a life-like representation of the object. The adage, "paint what you see, not what you think you see," using the right-brain mode of seeing, is key to capturing the shiny reflective quality of metal with all its nuances of value and hue.
Before painting anything close one eye (this flattens the image) and study several different metal objects of varying degrees of reflectivity. Look closely at the reflections. Notice what is being reflected in the metal object. Notice the shapes and colors of those reflections. Do you see both warm and cool colors? Can you identify the objects in the room that are being reflected? If there is a window can you see that? Can you see outside the window? Can you see the sky? Are the colors and shapes of the reflections the same as the original object being reflected or are they distorted somewhat? Notice the values in the metal object. Is there a range of values from light to dark? Do they blend into one each other gradually or are there sharp delineations between values? Are there reflections on other surfaces adjacent to the metal object?
Now draw your subject with a soft graphite pencil or charcoal to capture the values.
The more you look, the more you will see, and when you start to answer these questions you will be well on your way to being able to paint reflective metal objects.
You can take two different approaches to painting metal, the alla prima approach (all at once) or the glazing approach: direct vs. indirect. Both are perfectly good, the choice is a personal one.
The Old Masters generally did a thin monochromatic (one hue plus black and white) or grisaille (painting in shades of gray or a neutral hue) underpainting of their subject first to get the values right. They would follow this with glazes of color that would bring out the three-dimensionality and luster of the object, finished off with highlights of light and color.
The direct approach involves painting wet-into-wet, building up to thicker layers of paint, and generally finishing the work in one sitting. You will want to start with a thin underpainting of the local color of the metal you are painting. Then add the darkest darks to help provide structure, the mid values, and then the lights. Save the lightest lights and highlights for the very last. You can also tone your surface in a neutral hue before you begin if you want. This helps provide unity to the painting.
For either approach, it is very important to get your drawing right. Take time to make sure your drawing is accurate. It is easier and less wasteful of time and paints to make changes in the initial drawing stage than it is once you've covered your surface in paint and added details.
___________________________________
REFERENCES
1. Sorensen, Ora, Metals Made Easy, the Artists Magazine, December 2009, p.26.
2. Still Life Painting in Northern Europe, 1600-1800, Heilbronn Timeline of Art History, http://www.metmuseum.org/toah/hd/nstl/hd_nstl.htm, accessed 9/13/16.
3. Pioch, Nicholas, Chardin, Jean-Baptiste-Simeon, Web Museum, Paris,14 July 2002, https://www.ibiblio.org/wm/paint/auth/chardin/, accessed 9/13/16.
RESOURCES
Sorensen, Ora, Metals Made Easy, the Artists Magazine, December 2009, p.26.
Monahan, Patricia; Seligmann, Patricia; Clouse, Wendy; Art School, A Complete Painters Course, Octopus Publishing Group Ltd, 1996.
