Painting Cats

AlenaPaulus/Getty Images
Here are some tips and techniques to help you learn how to paint cats. Learn how to get the whiskers right and how to use a fur map.
01
of 02
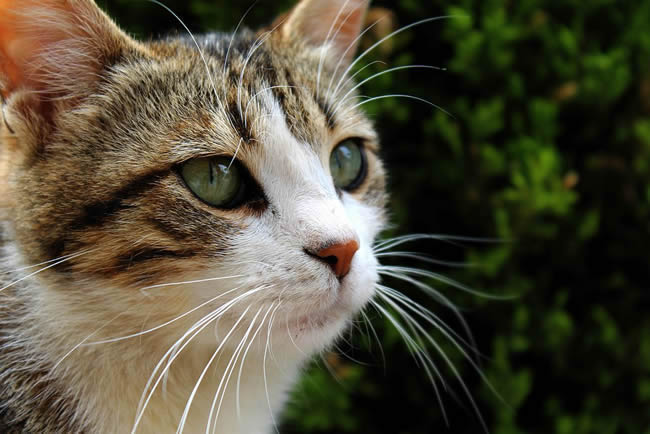
rabiem22/Flickr/CC BY 2.0
A crucial element in a great cat portrait -- in addition to painting a cat’s fur in the right direction -- is having accurate whiskers. Painting whiskers on a cat is not simply a question of painting a bunch of thin curvy lines coming out of the face near the mouth. Cats can have whiskers in four places: in rows alongside the mouth, in a group above the inner corner of the eye, in a small group on the cheek, and a few long bristles below the lower jaw. Each whisker grows out by itself; they don’t start at the same point.
There are four rows of whiskers on either side of the mouth. The whiskers are arranged like bricks in a wall, i.e. they alternate and directly above each other. You can see this in some photos, but it’s hard to see what's going on where the face is white. This is a classic example of where a reference photo isn't enough and you'll need to spend some time looking closely at the cat's face and making notes before painting.
Remember to count how many whiskers there are and look at the length of each whisker -- they’re not all automatically the same length as they fall out and new ones grow. A cat’s whiskers are also not the same thickness from base to tip -- they taper.
02
of 02
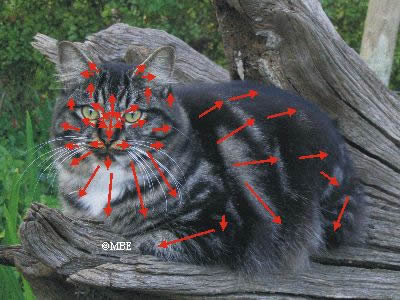
Marion Boddy-Evans
Two essential things for painting realistic fur on a cat portrait are to paint the hairs in the direction in which they grow (so from base to tip) and for the fur to be lying in the right direction on every part of the cat's face and body. This is where a fur map for painting a cat comes in handy.
A fur map (print the PDF) is a deceptively simple painting tool -- it’s just an indication of which direction a cat’s fur grows in on various parts of the face and body. We say deceptively simple because a fur map is relatively simple to create, but requires self-discipline to use. When you’re busy painting a cat, it’s all too easy to get carried away and not think about the direction the fur should lie and just paint 'generic' fur. All too often, when there’s something not quite working with a cat painting, this is it.
You’re not looking at the markings of an individual cat, or whether the fur is long or short, you’re looking at the overall direction of fur in a particular part of the body or face, which is similar in all cats. (Granted, it’s much harder to tell with a sleek, short-haired cat than a fluffy, long-haired one.) It’s about careful observation -- for example, does the fur on a cat’s nose go towards the ears or down towards the mouth? Does a cat have eyelashes? Which way do the long hairs inside a cat’s ear grow?
Make an outline drawing of a cat, or use a photo (as above), and make a note of all places where the fur changes direction. If in doubt when looking at your photo, go take a look at your cat (not that they'll make it easy!) Then when you start painting the cat portrait, put this fur map in a place you can easily refer to it.
