This Hatching Exercise Will Make Your Drawings Better


Do you want to add dimension and texture to your drawings? Don’t answer that...of course you do. Enter: hatching. This simple technique uses small clusters of lines to add shadows and perspective to a sketch. And it's totally easy to learn! To start, print out several copies of an outline of any object or shape (we used a hand). Then, test each of the six hatching techniques below on a different image. You'll find practice makes perfect.

Parallel hatching is one of the most basic forms of hatching, and a very effective way of demonstrating lightness and darkness. It consists of rows of parallel lines placed closely together. Anywhere you put hatching in a drawing, that area will appear darker or in shadow, and anywhere you don’t will appear as a highlight. All of the hatching is vertical in the example below, but it can be at any angle. Notice that some hatch marks are closer together, such as along the top of the index finger. When you increase the density of a collection of hatch marks, the area will appear darker, which can also be useful for creating value variations.

Rather than simple parallel lines, contour hatching is when the lines follow the contours of the subject. Here, the hatch marks go along the curves of the hand. This method of hatching greatly enhances the sense of volume and three-dimensionality of anything you are drawing, in addition to providing value.
This is such a well-known method that nearly every artist has encountered it, and it’s exactly what it sounds like. After laying down one pass of hatch marks, another set of hatch marks are drawn on top, usually in a perpendicular or near-perpendicular direction to the first set. This method is one of the quickest and most effective ways to vary the density and darken the values in your hatching. As you can see, it creates a richer overall feel to the drawing. Cross hatching can be applied as simple straight lines, just like parallel hatching, or it can follow the contours of the subject as below.

This is the richest and most subtle form of crosshatching, and it might even read as a tonal or pencil-shaded drawing from far away. The method is the same as above, with several layers of cross hatch marks rather than just two, to create even more nuanced differences in tone and value. A fine-line pen is the best tool for fine crosshatching, as the close marks will appear to blend together from a distance.
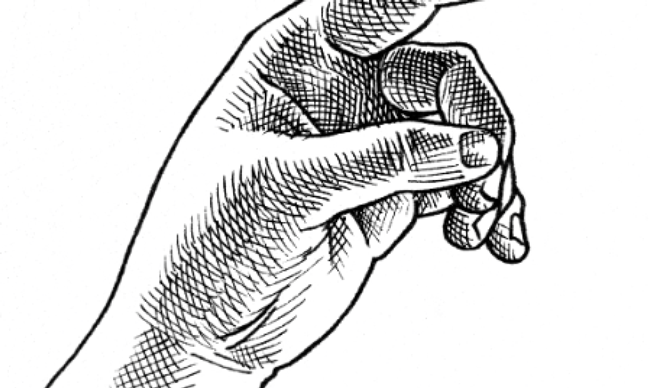
This is a very striking and graphic style of hatching when used correctly. Rather than all parallel marks, this method uses short sets of parallel marks in one direction, then an adjacent group of parallel marks in an almost perpendicular direction. The effect looks woven when done well, and they can also be crosshatched to add additional density.

This is another very graphic style of hatching, consisting of very short parallel strokes or “ticks.” Because the marks are so small and short, you can almost pile them on top of each other to create density. This style often works best with a thicker pen.
