When it comes to cartoons, some of the smallest details can make the biggest difference. (What would Garfield be without his sardonic, half-lidded eyes or Odie without his long, slobbery tongue?) The most expressive characters are made in those tiny strokes of the pen in rendering the facial features. Below are dozens of ideas and how-tos for eyes, noses, ears, mouths and hair.
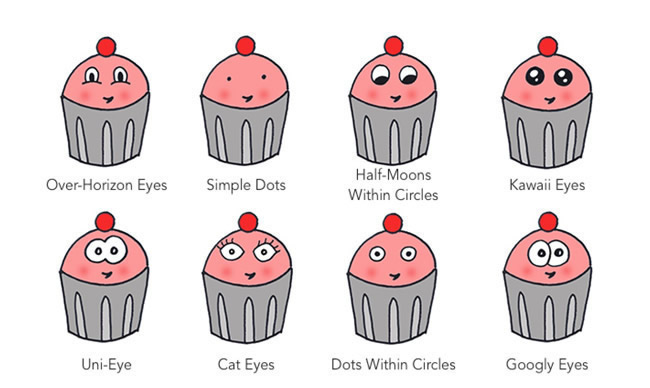
8 ways to draw cartoon eyes
Over-horizon eyes: Draw a slightly curved line that points downward, then draw a semi-circle above it. Fill in the pupil as either a dot or a semicircle.
Simple dots: Don’t overthink it! Make two dots that are about the same size. Dot eyes like these work best for simple drawings.
Half-moons within circles: Start by drawing circles, then fill in part of the circle to form the pupils. Where you position the pupils will show where the character is looking.
Kawaii eyes: Start by drawing large circles, then draw two smaller circles inside the first circle. Color in the area around the two circles. Just like that, you have sparkling eyes in the popular anime Japanese style!
Uni-eye: Draw the number 8 on its side, but leave the space in the middle open. Then draw pupils on each side of the 8 to create the illusion of two eyes.
Cat eyes: Start by drawing an almond shape, or the shape of cat eye glasses. Fill in the pupils either with dots, circles or half-moons. If you want to give your character a feminine flair, add eyelashes above or below the eyes.
Dots within circles: Instead of leaving the eyes as simple dots, draw a circle around the dot to create a pupil and the white of the eye.
Googly eyes: Draw one circle or oval. Fill in a second circle next to it, overlapping them a bit. Fill in the pupils however you like.
8 ways to draw cartoon noses
Backward L nose: Draw a slanted backwards L down the center of your character’s face. You can also use the letter J for a more rounded nose.
Swirly nose: Start by drawing the letter L, but when you reach the end, add a little swirl.
Double dots: Keep it simple by drawing two dots to suggest nostrils. This way, your character can have a nose, but you don’t have to draw a complex nose every time.
Handlebar nose: Start with a handlebar-shaped curve, sort of like a stretched-out U with a little tab on each end. Then draw a parentheses-shaped curve on each side of the handlebar.
Lightbulb nose: To draw this style of nose, draw and upside-down lightbulb shape on your character’s face — a round shape that extends with two straight lines.
Lightbulb nose with nostrils: Make the lightbulb nose more realistic by adding nostrils on either side of the bulb.
Pug nose: Draw a circle that’s incomplete at the bottom. Then draw two dots inside the circular space.
Nubby nose: This nose is as simple as drawing a lowercase C (or a backward C) in the center of your character’s face.
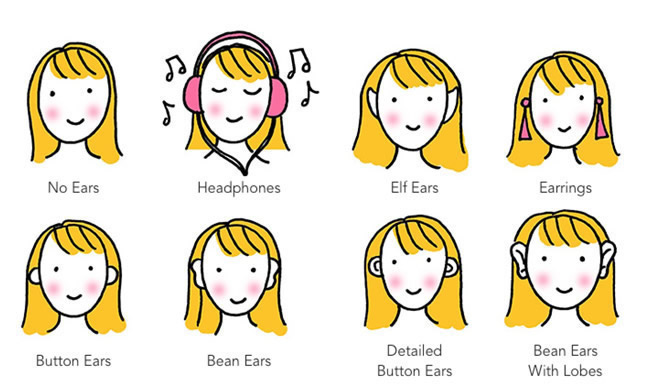
8 ways to draw cartoon ears
No ears: If you think ears will get in the way of your character, just leave them off!
Headphones: Try a prop! For example, draw headphones over where the ears would be.
Elf ears: For mischievous characters, draw pointed shapes on either side of the character’s head.
Earrings: If you want to show earrings, consider leaving the ears off all together. The earrings will suggest ears well enough.
Button ears: Simply draw semi-circles on either side of your character’s head, right around eye level.
Bean ears: Draw a long, curvy shape on either side of the head, with a little dip in the center (just like the curve of a kidney bean).
Detailed button ears: Give the button ears more detail by adding another semi-circle inside each ear.
Bean ears with lobes: Make the bean ear more realistic by adding small, curved lines to show the ear lobe and the top of the ear.
8 ways to draw cartoon mouths
Simple line: A line with a slight curve can easily look like a smile or a frown.
Small oval: Draw a tiny number zero below your cartoon character’s nose to show surprise or shock.
Exposed teeth: Draw an outline shape to form your character’s mouth (either a smile, a frown or a rounded rectangle). Fill in the outlined shape with a grid to serve as teeth.
Wide open mouth: Draw a large circle or oval. Fill in the lower portion with two bumps, like the top of a heart, and color the bumps pink or red. Then fill in the upper part with a dark color.
Wavy line: Make a small line with many waves to show that your character is uncomfortable or nervous.
Two-part line: Draw a curved V on its side to show more motion around the mouth, like if your character is talking.
Simple line with tongue: Start with a simple smile, then add more details! A tongue is a fun addition, but you can also add teeth or dimples.
Lipstick lips: Start by drawing a simple line smile, then add two little mounds on top of the line and one mound under the line. Color them pink or red to finish off the lips.
8 ways to draw cartoon hair
Spiky hair: Draw loose, zigzag lines that point up following the curve of your character’s head.
Long hair with bangs: Choose a “part” on top of the character’s head. Then, draw lines that start at the part and follow the curve of the character’s face You can add a little wave to the lines to give the hair extra body. To add bangs, draw a few lines moving downward from the top of the head.
Bedhead: Scribble in all directions on top of your character’s head to make wacky, messy hair.
Braids: First, choose a part and draw a bit of hair along the side of the hair, down to cheek level. Then, draw two scalloped lines that facing away from each other and are slightly offset. Finish it off with a few lines for a hair tie and a little tuft of hair.
Bun: Draw a round mound that follows the shape of your character’s head, and then draw a hemisphere on top of the mound. Add a few vertical lines to the top hemisphere for a little more detail.
Ponytail: Start by drawing a small, rounded rectangle or oval whenever you want the ponytail to be. Draw two rounded lines for the ponytail, Add a few spikes at the end to show the end of the hair.
Curly hair: Draw a scalloped or bumpy line that follows the curve of your character’s face.
Short haircut: Choose a part on the character’s head, then draw loose zigzag lines on either side of the part, over the character’s face.