Painting Clouds Wet-on-Wet Using Acrylic or Oil Paints

The art term wet-on-wet means exactly what it appears to—painting onto paint that is still wet. The other option available to you is to paint onto dry paint, know (unsurprisingly) as working wet-on-dry. Quite different results are achieved with each approach.
Painting wet-on-wet means that you can blend or mix colors as you're painting, directly on the canvas. This is useful for painting clouds as it means you can create soft edges easily. (The one thing you can't do painting wet-on-wet than you can do painting wet-on-dry is to build up color through glazing.)
01
of 04

2007 Marion Boddy-Evans
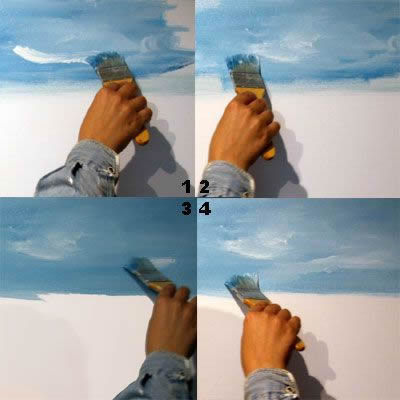
In this demonstration, I started by initially painting the blue for the sky (photo 1), then while it was still wet, going in with white paint on my brush to create the clouds (photo 3). You can see that I'm working with a fairly wide brush. Once I've started adding white paint, I use one edge of the brush for white and the other for blending into blue (photo 2).
02
of 04
2007 Marion Boddy-Evans
Judging just how far you blend the white that you're adding to create the clouds into the blue of the sky comes with experience. But one of the advantages of painting wet-on-wet is that if you add too much white and the sky blue becomes too light, you can either scrape it off or add more blue.
Blend the white in too little and you end up with cotton-wool style clouds that sit on top of the blue sky, not in it. Blend the white in too much and you end up with pale blue sky without any discernible clouds. It's a bit like Goldilocks trying the bowls of breakfast porridge... through trial and error (experience) you get the result you're after.
03
of 04
2007 Marion Boddy-Evans
There's no right or wrong way to add a color or to blend a color when painting wet on wet. How you move the brush will determine the result. What you get from experience is the predictability of what you'll produce.
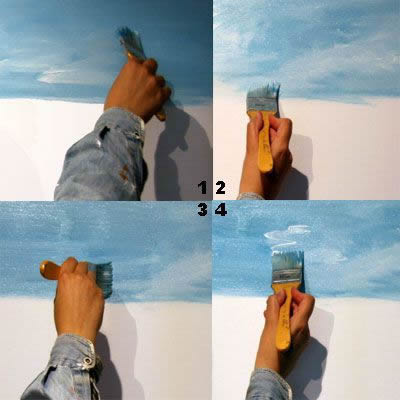
In Photo 1 I've blended the top of the cloud into the sky almost totally, leaving the strong white at the bottom. In Photo 2, I've softened the edges of the cloud both top and bottom to create a long, soft cloud.
In Photo 3 I'm brushing out a cloud that didn't work satisfactorily, working the still-wet blue back across the white. In Photo 4, I've just put down a fresh portion of white and move the brush down, zig-zagging it to create the edge of a cloud.
Painting wet-on-wet is something that gets easier with practice. Start with doing studies, rather than with the intention of doing a finished painting.
04
of 04

2007 Marion Boddy-Evans
Something beginners tend to forget or not observe is that clouds have shadows in them, they're not just pure white all over. Even clouds on a bright sunny day. But by shadow I don't mean black, I mean darker in tone.
The colors you use for this obviously depends on what you're using in your painting. My first choice for the darker tones would be white mixed with the blue you're using for the sky. Then if you need it to be darker still, for instance for dark rain clouds, add in a little of the darkest color you're using in the rest of the painting.
For instance, the paint-smeared object in my hand (Photo 4) is the moisture-retaining palette I use for acrylic paints. On it is Prussian blue, turquoise blue, raw umber, and white. In the clouds above the palette, I've used only blue and white, in a variety of tones. If I wanted to create a feeling of pending rain from the clouds, I'd use a little of the raw umber mixed with Prussian blue for a dark tone. Why raw umber? Well, because the clouds are part of a seascape and that's the color paint I had chosen for the rocks.
